准备
-
一个 k8s 集群,使用 kubesphere 安装
 1
 2
 3
 4
 5
 6
 7
 8
 9
10
11
12
13
14
15
16
17
18
19
20
21
|
centos

./kk create config --with-kubernetes v1.26.0 --with-kubesphere

./kk create cluster -f config-sample.yaml

 低版本的k8s:
 ./kk create cluster --with-kubernetes v1.22.12 --with-kubesphere v3.4.1


ubuntu 20.04

all in one 部署

./kk create cluster --with-kubernetes v1.26.0 --with-kubesphere v3.4.1 --container-manager containerd

多节点 高可用部署

./kk create config --with-kubesphere 3.4.1 --with-kubernetes v1.26.0

./kk create cluster -f config-sample.yaml
|
-
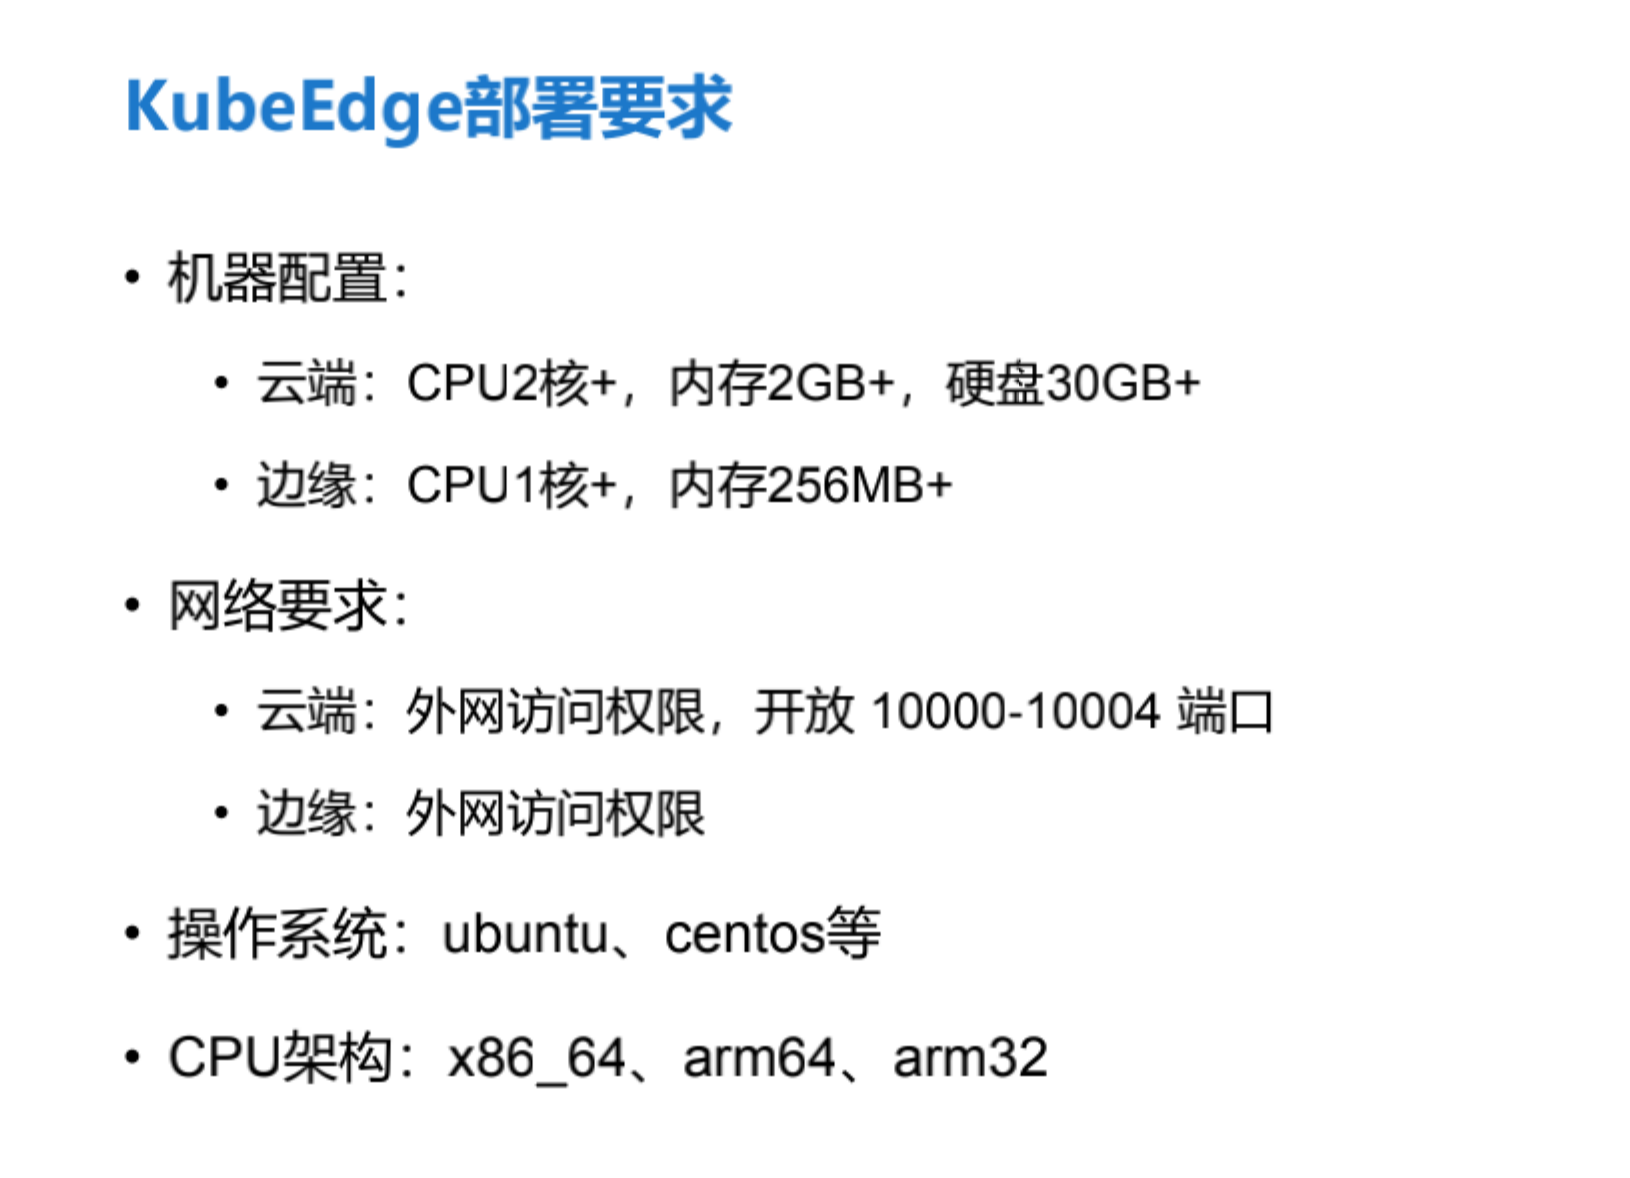
一个 边缘节点 可以访问集群,contained 版本 >=1.6 ,如果是 docker 记得安装 CRI-dockerd.

安装contained
如果之前安装了 docker ,使用下面命令卸载
 1
 2
 3
 4
 5
 6
 7
 8
 9
10
11
12
13
|
systemctl stop docker
systemctl stop docker.socket
systemctl stop containerd

yum list installed | grep docker

yum -y remove containerd.io.x86_64 \
              docker-ce.x86_64 \
              docker-ce-cli.x86_64 \
              docker-ce-rootless-extras.x86_64 \
              docker-compose-plugin.x86_64 \
              docker-scan-plugin.x86_64 \
							docker-buildx-plugin.x86_64
|
安装最新版本containerd
 1
 2
 3
 4
 5
 6
 7
 8
 9
10
11
12
13
14
15
16
17
18
19
20
21
22
|
centos

sudo yum install -y yum-utils
sudo yum-config-manager --add-repo https://download.docker.com/linux/centos/docker-ce.repo

sudo yum install  containerd.io

# Configure containerd
mkdir -p /etc/containerd
containerd config default > /etc/containerd/config.toml

ubuntu

# Install containerd
apt-get update && apt-get install -y containerd

# Configure containerd
mkdir -p /etc/containerd
containerd config default > /etc/containerd/config.toml

# Restart containerd
systemctl restart containerd
|
openEuler 系统安装 contained 步骤
下载安装包
1
2
3
|
wget https://github.com/containerd/containerd/releases/download/v1.7.2/containerd-1.7.2-linux-arm64.tar.gz
wget https://github.com/opencontainers/runc/releases/download/v1.1.12/runc.arm64
wget https://github.com/containernetworking/plugins/releases/download/v1.4.0/cni-plugins-linux-arm64-v1.4.0.tgz
|
安装
 1
 2
 3
 4
 5
 6
 7
 8
 9
10
11
12
13
14
15
16
17
18
19
20
21
22
23
24
25
26
27
28
29
30
31
32
33
34
35
36
37
38
39
40
41
|
tar -zxvf containerd-1.7.2-linux-arm64.tar.gz -C /usr/local
install -m 755 runc.arm64 /usr/local/sbin/runc
mkdir -p /opt/cni/bin
tar -zxvf cni-plugins-linux-arm64-v1.4.0.tgz -C /opt/cni/bin

mkdir -p /etc/cni/net.d/

cat >/etc/cni/net.d/10-containerd-net.conflist <<EOF
{
  "cniVersion": "1.0.0",
  "name": "containerd-net",
  "plugins": [
    {
      "type": "bridge",
      "bridge": "cni0",
      "isGateway": true,
      "ipMasq": true,
      "promiscMode": true,
      "ipam": {
        "type": "host-local",
        "ranges": [
          [{
            "subnet": "10.88.0.0/16"
          }],
          [{
            "subnet": "2001:db8:4860::/64"
          }]
        ],
        "routes": [
          { "dst": "0.0.0.0/0" },
          { "dst": "::/0" }
        ]
      }
    },
    {
      "type": "portmap",
      "capabilities": {"portMappings": true}
    }
  ]
}
EOF
|
配置containerd
1
2
|
mkdir -p /etc/containerd
containerd config default > /etc/containerd/config.toml
|
配置service
vim /usr/lib/systemd/system/containerd.service
 1
 2
 3
 4
 5
 6
 7
 8
 9
10
11
12
13
14
15
16
17
18
19
20
21
22
23
24
25
26
27
28
29
30
31
32
33
34
35
36
37
38
39
40
41
|
# Copyright The containerd Authors.
#
# Licensed under the Apache License, Version 2.0 (the "License");
# you may not use this file except in compliance with the License.
# You may obtain a copy of the License at
#
#     http://www.apache.org/licenses/LICENSE-2.0
#
# Unless required by applicable law or agreed to in writing, software
# distributed under the License is distributed on an "AS IS" BASIS,
# WITHOUT WARRANTIES OR CONDITIONS OF ANY KIND, either express or implied.
# See the License for the specific language governing permissions and
# limitations under the License.

[Unit]
Description=containerd container runtime
Documentation=https://containerd.io
After=network.target local-fs.target

[Service]
ExecStartPre=-/sbin/modprobe overlay
ExecStart=/usr/local/bin/containerd

Type=notify
Delegate=yes
KillMode=process
Restart=always
RestartSec=5

# Having non-zero Limit*s causes performance problems due to accounting overhead
# in the kernel. We recommend using cgroups to do container-local accounting.
LimitNPROC=infinity
LimitCORE=infinity

# Comment TasksMax if your systemd version does not supports it.
# Only systemd 226 and above support this version.
TasksMax=infinity
OOMScoreAdjust=-999

[Install]
WantedBy=multi-user.target
|
启动
1
2
|
systemctl start containerd
systemctl status containerd
|
参考链接
https://cloud.tencent.com/developer/article/2383890
使用Keadm进行部署
Keadm 是一款用于安装 KubeEdge 的工具。 Keadm 不负责 K8s 的安装和运行,在使用它之前,请先准备好一个 K8s 集群。
KubeEdge 对 Kubernetes 的版本兼容性,更多详细信息您可以参考 kubernetes-兼容性 来了解,以此来确定安装哪个版本的 Kubernetes 以及 KubeEdge。
使用限制
keadm 目前支持 Ubuntu 和 CentOS OS。- 需要超级用户权限(或 root 权限)才能运行。
设置云端(KubeEdge 主节点)
默认情况下边缘节点需要访问 cloudcore 中 10000 ,10002 端口。 若要确保边缘节点可以成功地与集群通信,您需要创建防火墙规则以允许流量进入这些端口(10000 至 10004)。
重要提示:
- 必须正确配置 kubeconfig 或 master 中的至少一个,以便可以将其用于验证 k8s 集群的版本和其他信息。
- 请确保边缘节点可以使用云节点的本地 IP 连接云节点,或者需要使用
--advertise-address 标记指定云节点的公共 IP 。
--advertise-address(仅从 1.3 版本开始可用)是云端公开的地址(将添加到 CloudCore 证书的 SAN 中),默认值为本地 IP。keadm init 将会使用二进制方式部署 cloudcore 为一个系统服务,如果您想实现容器化部署,可以参考 keadm beta init 。
安装 CloudCore
1
2
3
4
5
|
keadm init --advertise-address=10.108.96.24

// k8s 多节点的时候,配置 cloudcore 所在节点的地址

keadm init --advertise-address=10.101.32.14,10.101.32.15 --set cloudCore.service.enable=true --set cloudCore.hostNetWork=true --profile version=v1.15.1 --kube-config=/root/.kube/config
|
使用1.17.0版本 支持边缘Pods使用InClusterConfig访问Kube-APIServer
1
|
keadm init --advertise-address=10.11.140.131,10.11.140.86 --set cloudCore.featureGates.requireAuthorization=true,cloudCore.modules.dynamicController.enable=true mosquitto.enable=false --kubeedge-version=v1.17.0
|
检查 cloudcore 是否安装成功
1
|
kubectl get pods -n kubeedge
|
卸载 CloudCore
1
|
keadm reset --kube-config=/root/.kube/config
|
设置太空端
安装 CNI 插件
 1
 2
 3
 4
 5
 6
 7
 8
 9
10
11
12
13
14
15
16
17
18
19
20
21
22
23
24
25
26
27
28
29
30
31
32
33
34
35
36
37
38
39
40
|
mkdir -p /opt/cni/bin

tar Cxzvf /opt/cni/bin cni-plugins-linux-amd64-v1.4.0.tgz

mkdir -p /etc/cni/net.d/

cat >/etc/cni/net.d/10-containerd-net.conflist <<EOF
{
  "cniVersion": "1.0.0",
  "name": "containerd-net",
  "plugins": [
    {
      "type": "bridge",
      "bridge": "cni0",
      "isGateway": true,
      "ipMasq": true,
      "promiscMode": true,
      "ipam": {
        "type": "host-local",
        "ranges": [
          [{
            "subnet": "10.88.0.0/16"
          }],
          [{
            "subnet": "2001:db8:4860::/64"
          }]
        ],
        "routes": [
          { "dst": "0.0.0.0/0" },
          { "dst": "::/0" }
        ]
      }
    },
    {
      "type": "portmap",
      "capabilities": {"portMappings": true}
    }
  ]
}
EOF
|
重启 containerd
1
2
3
4
5
|
systemctl daemon-reload

systemctl restart containerd

systemctl restart containerd.service
|
CNI 安装参考链接
可选:安装 cri-dockerd(运行时为 docker )
 1
 2
 3
 4
 5
 6
 7
 8
 9
10
11
|
tar  zxvf cri-dockerd-0.3.9.arm64.tgz

cp cri-dockerd/cri-dockerd /usr/local/bin/cri-dockerd

cp cri-docker.service cri-docker.socket /etc/systemd/system/

sed -i -e 's,/usr/bin/cri-dockerd,/usr/local/bin/cri-dockerd,' /etc/systemd/system/cri-docker.service

systemctl daemon-reload
systemctl enable cri-docker.service
systemctl enable --now cri-docker.socket
|
-
重启 docker
1
|
systemctl restart docker
|
安装 EdgeCore
根据前面的准备步骤,安装 CNI CRI-dockerd
-
纳管 边缘节点
containerd
1
|
keadm join --cloudcore-ipport=10.108.96.24:10000 --token=45055f5cd0eb033764cfb24ce4a5f64636862f7945efb174ff69eb437aafdfa9.eyJhbGciOiJIUzI1NiIsInR5cCI6IkpXVCJ9.eyJleHAiOjE3MTcxMjU1NDd9.YIgECHxVGU6Yq23zhMjAjPQ0TUOFWnMgqAQyQvdsaNM --kubeedge-version=1.15.1 --runtimetype=remote --with-mqtt=false
|
docker
1
|
keadm join --cloudcore-ipport=10.108.96.24:10000 --token=8cc6fc16618f8fc7b98a0221683b26d36a9b571c9257aac544574bb9dc014f74.eyJhbGciOiJIUzI1NiIsInR5cCI6IkpXVCJ9.eyJleHAiOjE3MTE2OTY4MTR9.EgxPs9Z5MFHSUxCwM9rvyY9XjWXBHKxZmezi7pzyOIo --kubeedge-version=1.15.1 --with-mqtt=false --remote-runtime-endpoint=unix:///var/run/cri-dockerd.sock
|
-
查看状态
systemctl status edgecore
部署应用到边缘节点
部署 redis
 1
 2
 3
 4
 5
 6
 7
 8
 9
10
11
12
13
14
15
16
17
18
19
20
21
22
23
24
25
26
27
28
|
apiVersion: apps/v1 #  for k8s versions before 1.9.0 use apps/v1beta2  and before 1.8.0 use extensions/v1beta1
kind: Deployment
metadata:
  name: redis-master
spec:
  selector:
    matchLabels:
      app: redis
      role: master
      tier: backend
  replicas: 1
  template:
    metadata:
      labels:
        app: redis
        role: master
        tier: backend
    spec:
      nodeName: node5
      containers:
      - name: master
        image: registry.k8s.io/redis:e2e  # or just image: redis
        resources:
          requests:
            cpu: 100m
            memory: 100Mi
        ports:
        - containerPort: 6379
|
部署 nginx
 1
 2
 3
 4
 5
 6
 7
 8
 9
10
11
12
13
14
15
16
17
18
19
20
21
22
23
24
25
26
27
28
|
apiVersion: apps/v1 #  for k8s versions before 1.9.0 use apps/v1beta2  and before 1.8.0 use extensions/v1beta1
kind: Deployment
metadata:
  name: redis-master
spec:
  selector:
    matchLabels:
      app: redis
      role: master
      tier: backend
  replicas: 1
  template:
    metadata:
      labels:
        app: redis
        role: master
        tier: backend
    spec:
      nodeName: jetpack513
      containers:
      - name: master
        image: registry.k8s.io/redis:e2e  # or just image: redis
        resources:
          requests:
            cpu: 100m
            memory: 100Mi
        ports:
        - containerPort: 6379
|
去掉 daemonset 部署在边缘节点上
kubectl label nodes tjmaster master=true
kubectl edit daemonset calico-node -n kube-system
kubectl edit daemonset kube-proxy -n kube-system
kubectl edit daemonset nodelocaldns -n kube-system
- 增加一个标签 master: “true”,没有标签就都加上。


查看太空端服务日志
1.开启日志

2.重启 edgecore
service edgecore restart
问题汇总
常见问题:
-
CNI 网络问题,安装CNI插件,后重启。
安装脚本地址

ctr -n k8s.io t ls, 如果有残留的task,请执行ctr -n k8s.io t kill {task id}清理ctr -n k8s.io c ls, 如果有残留的容器,请执行ctr -n k8s.io c rm {container id}清理- 执行
systemctl restart containerd.service重启containerd
-
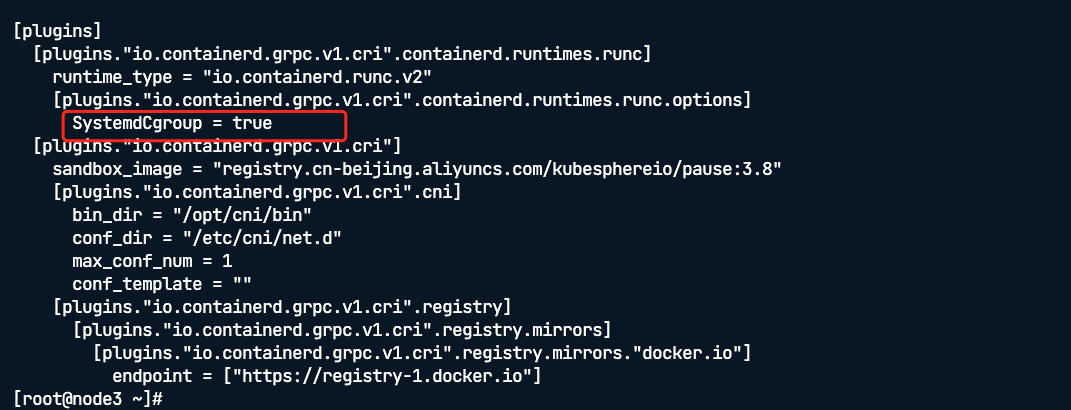
Cgroup driver
删掉这行
-
netstat -anpt |grep 10002 查看 cloudcore 是否能部署在这上面
-
注意 边缘节点的node id 和 cloud 节点名字不能重复
-
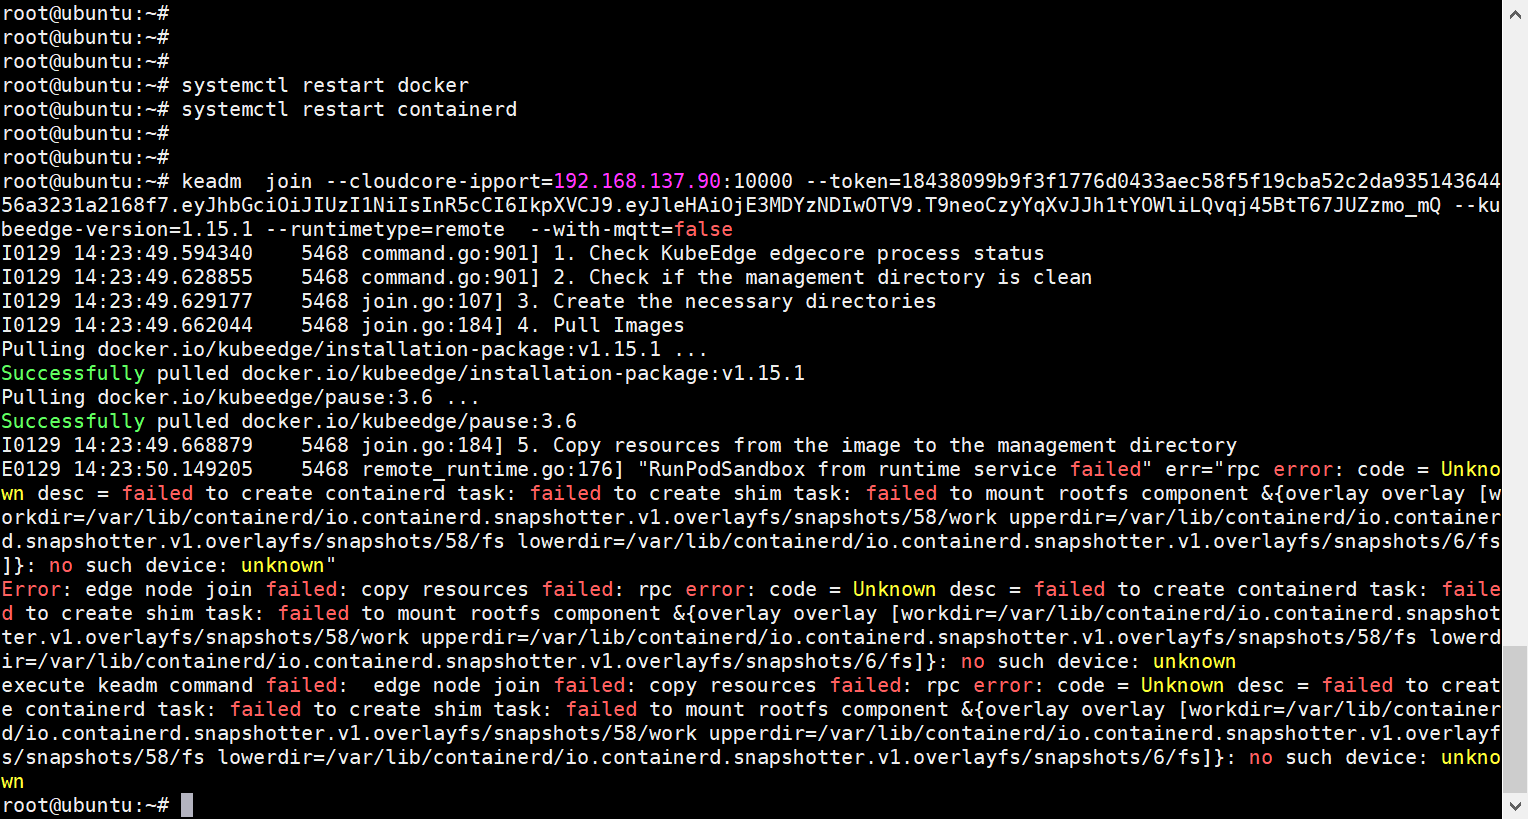
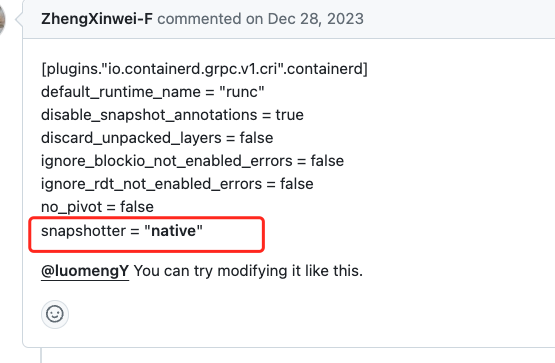
can’t mount rootfs的问题

修改 containerd 的配置

-
220 上部署 containerd 问题比较多,换成 docker 需要安装 cri-dockerd。使用 cri-dockerd 的时候,keadm join 的时候 记得加上参数 –remote-runtime-endpoint=unix:///var/run/cri-dockerd.sock
更多问题可以访问kubeedge FAQ


